Step-by-Step Guide for Board Members
- New User Registration
- Activate / Reset Account?
- How to Access Study Documents
- Recording a Decision or Recommendation
- How to Access Agendas
New User Registartion
- Log in to www.IRBNet.org
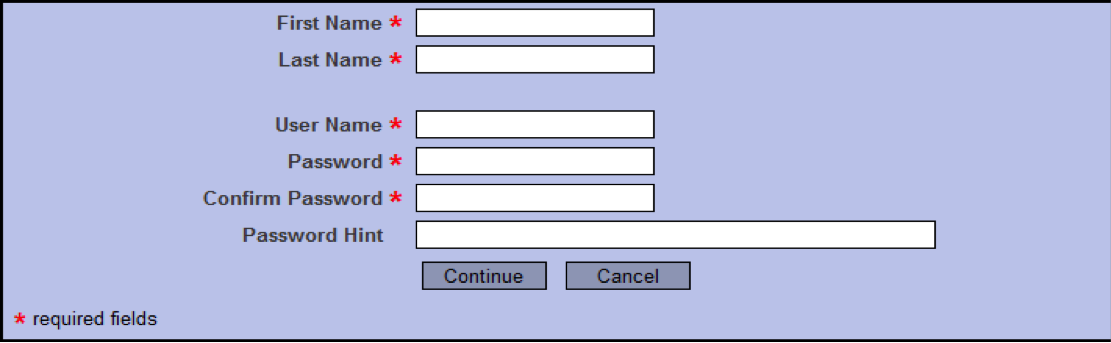
- Click: New User Registration in the upper right hand corner (if you have registered then ignore this step).
- Enter your legal first and last names in the appropriate fields. (Please use upper case letters when appropriate as you register into the system; the system does not alphabetize names that begin with lower-case letters.)
- Create your User Name and Password; confirm your password, and enter a password hint.
- Select Continue
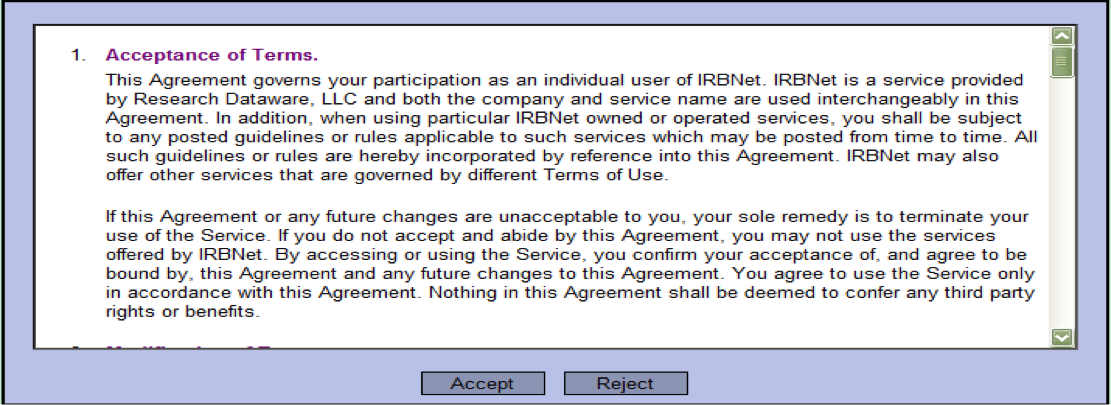
- Accept the Terms of Use
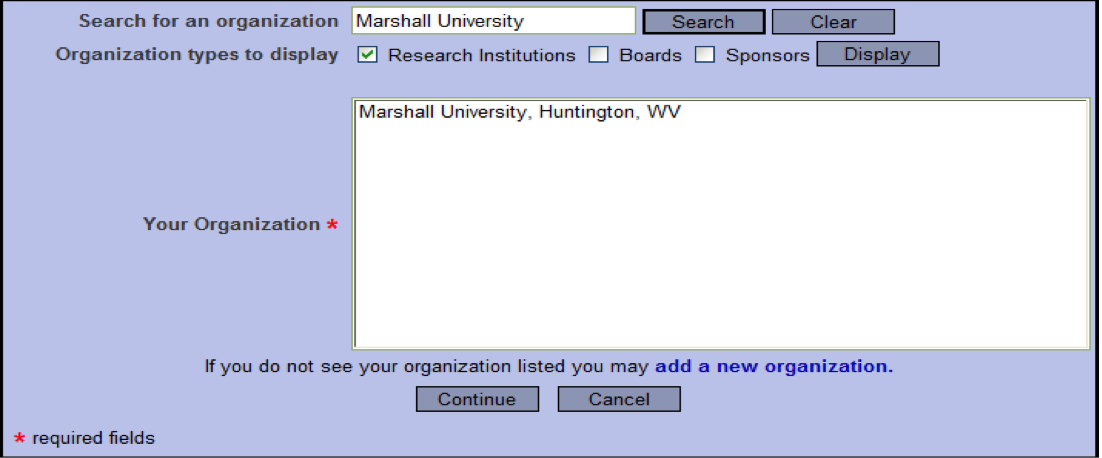
- On the next screen, type “Grand Canyon University” in the “Search for an organization” field and click “Search” OR scroll to and select “Grand Canyon University, Phoenix, AZ” from the list on the screen.
- Select Continue
- On the next screen, enter your telephone number and email address; select Continue
- On the final screen, you will confirm the information you entered. Be sure in the second box, it lists Grand Canyon University, and then select Register.
- You will receive an email from IRBNet with a link that you need to click on to activate your account. Your name will appear on Grand Canyon University’s list after you activate your account. **


Activate / Reset Account?
If you have not received the email authentication from IRBNet it is because either . . .
- The email address was incorrectly typed,
- There is a filter on your email blocking the authentication, or
- You have an alternate account (if so, please create a new email account with Yahoo/ Gmail/ Hotmail).
Try these steps:
Check your spam filters/delete box. If the email is not there, then follow the steps below.
- Log in to www.IRBNet.org
- In the upper right corner of the screen, click on “USER PROFILE”
- At the bottom of the next screen where you see Affiliations, click Edit
- Change your email address
- Enter a new or different fax number
- Click on Save. This will trigger a new activation email that will be sent to your account.
- When you receive the email, click the link in the message. This will take you to the home page of IRBNet, indicating that your account has been successfully activated.
Note: To change email accounts click on the User Profile. This is accessible even if you have not activated your account. Please avoid creating more than one IRBNet account.
How to Access Study Documents
- Log into www.IRBNet.org
- The Submission Manager page will appear. (If you are also a Dissertation Chair, “Study Manager” will appear in the menu of options at the left of your screen.)
- The default setting of the “View by Agenda” drop-down menu on the Submission Manager page is set to “Unassigned,” and the checkbox to the right is always checked to “only show those submissions awaiting review.” (The studies are sorted by submission date with the most recent on top.)
- To view “All Submissions”:
- Select “All Submissions” from the drop-down menu.
- Click on the checkbox to “un-select” that “only show those submissions awaiting review”
- Click the “Show Submissions” button. All submissions will appear.
- To view “All Submissions” that have not yet been reviewed:
- Select “All Submissions” from the drop-down menu, but do not “un-select” the box, showing “only show those submissions awaiting review”;
- Click the “Show Submissions” button. All the submissions that have not yet been reviewed will appear.
- To view submissions by agenda:
- Select the appropriate date from the drop-down menu.
- If you wish to see only those that you have not reviewed, leave the checkbox selected.
- Click the “Show Submissions” button; the submissions for that month will appear.
- To view “All Submissions”:
- Select the study by clicking on the title that appears in blue font.
- Clicking on the title will bring up the “Submission Detail” for that particular study.
- All the documents for a study will appear on this screen beneath the “Study Details,” “Submission Details,” and the “Review Details.”
- To access individual documents, simply click on the name of the document that appears in blue font. (See the example that follows. Note that the hyperlinks have been removed, and the names used are pseudonyms.)
- You may also access the document by clicking on the document icon in the “View” column at the far right. (See the example that follows.) *
- A yellow flag next to the document name indicates a new document that the researcher may have added after the original submission.
*Note: If you make comments directly on the researcher’s documents, you will need to save the document onto your computer and upload your saved copy.
Recording a Decision or Recommendation
- After you have evaluated the protocol, scroll to the bottom of the “Submission Detail” page (the page from which you accessed the documents).
- Click “Add comments and reviewer documents to this submission” at the bottom of the screen.
- On the next screen, click “Update” (in yellow font). A pop-up window will appear.
- Type your decision or recommendation and any related comments in the field. Note: There is a 500-character limit within this field. Click the “Save” button. (You may change or edit your comments by clicking “Update” again.)
- From the “Reviewer’s Comments” screen, you will also upload the Evaluation Form from your own computer.
- Click “Attach reviewer documents.”
- On the next screen, select “Reviewer Worksheet” from the drop-down menu.
- Type a description if desired.
- Click “Browse” to select the appropriate Evaluation Form.
- Click “Attach” to add the form to the study’s documents.
- Click “Return to Submission Detail.”
- If you realize that you have attached the wrong document, you may access the “Reviewer’s Comments” page and click “Delete” (in the column at the far right). Then follow the steps to attach the appropriate document.
How to Access Agendas
- Log into www.IRBNet.org
- The Submission Manager page will appear.
- At the bottom of the screen, you will see Agenda, Minutes and other Administrative Documents for this Meeting.
- Click the icon at the bottom of the screen.
- Then click “Open” to view a PDF of the agenda for the next month’s meeting if it has been published.
- To access agendas from previous months, click the “Agendas and Minutes” link at the left of the screen.
- On the Agenda Manager page, select the “Document” icon to the right of the meeting date you wish to access (e.g., 04/02/2010).
- On the Agenda Documents page, click Agenda.*
- Then click “Open” to view a PDF of the agenda for the meeting.
*Note: Agendas will include the titles of all studies approved through expedited procedures for the review period.